
1. Introduction
This guide covers everything you need to get the most out of the Amorfs Data for Figma. Whether you're just getting started or running into something unexpected, you'll find the full picture here, from your first export to understanding what the plugin does behind the scenes.
If you haven't read the overview post yet, no worries. In short: the plugin lets you embed structured data directly into your Figma designs so that any system reading your exported file understands exactly what's inside it, without guesswork or scanning errors.
1. Introduction
This guide covers everything you need to get the most out of the Amorfs Data for Figma. Whether you're just getting started or running into something unexpected, you'll find the full picture here, from your first export to understanding what the plugin does behind the scenes.
If you haven't read the overview post yet, no worries. In short: the plugin lets you embed structured data directly into your Figma designs so that any system reading your exported file understands exactly what's inside it, without guesswork or scanning errors.
1. Introduction
This guide covers everything you need to get the most out of the Amorfs Data for Figma. Whether you're just getting started or running into something unexpected, you'll find the full picture here, from your first export to understanding what the plugin does behind the scenes.
If you haven't read the overview post yet, no worries. In short: the plugin lets you embed structured data directly into your Figma designs so that any system reading your exported file understands exactly what's inside it, without guesswork or scanning errors.
2. How to Use
Getting started is simpler than it sounds. The plugin works directly inside Figma and only needs one thing from you: a frame to work with.
Step 1 — Download Amorfs Data for Figma
Click the link below to download the plugin ZIP file to your computer.
👉 Install Amorfs Data for Figma
Step 2 — Extract and install
Unzip the downloaded file to a folder on your computer.
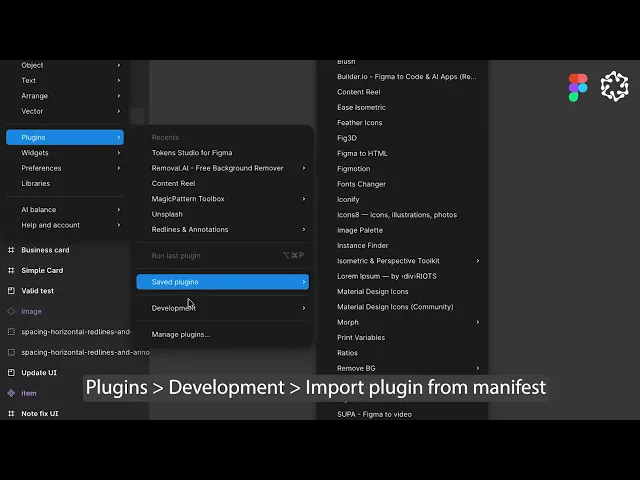
Then open Figma and go to Plugins > Development > Import plugin from manifest.
Navigate to the extracted folder, select the manifest.json file, and the plugin will appear in your plugins list ready to use.
Step 3 — Launch the plugin
Open any Figma file you want to work with. Go to Plugins > amorfs-figma-plugin to launch it.
Step 4 — Pick your frame
On your canvas, select exactly one object. It needs to be either a Frame or a Component. The plugin won't run on multiple selections or other layer types, so keep it to one at a time.
Step 5 — Let it run
No buttons to click. Once you've made a valid selection, the plugin starts analyzing automatically. Give it a few seconds depending on how complex your design is.
Step 6 — Review your output
Once processing is done, you'll see:
Preview: A rendered view of your Amorfs document. You can zoom in or reset the view as needed.
Content Tabs: Three tabs showing what was extracted from your design:
Data — the structured data pulled from your layers
Template — the generated template format
Full — the complete bundle combining both
Export as image (.png): Download your design as a PNG with the Amorfs data embedded inside, ready for processing by any downstream system.
Download package (.zip): Download the full package including your .amf file and all associated assets.
Copy Data: Copy full the Amorfs Data to paste into Amorfs Studio or anywhere else you need it.
2. How to Use
Getting started is simpler than it sounds. The plugin works directly inside Figma and only needs one thing from you: a frame to work with.
Step 1 — Download Amorfs Data for Figma
Click the link below to download the plugin ZIP file to your computer.
👉 Install Amorfs Data for Figma
Step 2 — Extract and install
Unzip the downloaded file to a folder on your computer.
Then open Figma and go to Plugins > Development > Import plugin from manifest.
Navigate to the extracted folder, select the manifest.json file, and the plugin will appear in your plugins list ready to use.
Step 3 — Launch the plugin
Open any Figma file you want to work with. Go to Plugins > amorfs-figma-plugin to launch it.
Step 4 — Pick your frame
On your canvas, select exactly one object. It needs to be either a Frame or a Component. The plugin won't run on multiple selections or other layer types, so keep it to one at a time.
Step 5 — Let it run
No buttons to click. Once you've made a valid selection, the plugin starts analyzing automatically. Give it a few seconds depending on how complex your design is.
Step 6 — Review your output
Once processing is done, you'll see:
Preview: A rendered view of your Amorfs document. You can zoom in or reset the view as needed.
Content Tabs: Three tabs showing what was extracted from your design:
Data — the structured data pulled from your layers
Template — the generated template format
Full — the complete bundle combining both
Export as image (.png): Download your design as a PNG with the Amorfs data embedded inside, ready for processing by any downstream system.
Download package (.zip): Download the full package including your .amf file and all associated assets.
Copy Data: Copy full the Amorfs Data to paste into Amorfs Studio or anywhere else you need it.
2. How to Use
Getting started is simpler than it sounds. The plugin works directly inside Figma and only needs one thing from you: a frame to work with.
Step 1 — Download Amorfs Data for Figma
Click the link below to download the plugin ZIP file to your computer.
👉 Install Amorfs Data for Figma
Step 2 — Extract and install
Unzip the downloaded file to a folder on your computer.
Then open Figma and go to Plugins > Development > Import plugin from manifest.
Navigate to the extracted folder, select the manifest.json file, and the plugin will appear in your plugins list ready to use.
Step 3 — Launch the plugin
Open any Figma file you want to work with. Go to Plugins > amorfs-figma-plugin to launch it.
Step 4 — Pick your frame
On your canvas, select exactly one object. It needs to be either a Frame or a Component. The plugin won't run on multiple selections or other layer types, so keep it to one at a time.
Step 5 — Let it run
No buttons to click. Once you've made a valid selection, the plugin starts analyzing automatically. Give it a few seconds depending on how complex your design is.
Step 6 — Review your output
Once processing is done, you'll see:
Preview: A rendered view of your Amorfs document. You can zoom in or reset the view as needed.
Content Tabs: Three tabs showing what was extracted from your design:
Data — the structured data pulled from your layers
Template — the generated template format
Full — the complete bundle combining both
Export as image (.png): Download your design as a PNG with the Amorfs data embedded inside, ready for processing by any downstream system.
Download package (.zip): Download the full package including your .amf file and all associated assets.
Copy Data: Copy full the Amorfs Data to paste into Amorfs Studio or anywhere else you need it.
3. Understanding Your Output
When you download the package, you'll get a .zip file that looks something like this:
your-frame-name.zip
your-frame-name.amf
USER_GUIDELINE_EN.txt
assets/
(your images and icons)
The most important file in there is the .amf file. This is a plain text file that contains two things: your data and your template.
The data section holds all the structured information the plugin extracted from your design, things like field names and their values, organized in a clean, readable format.
The template section holds the visual layout of your design as HTML and CSS, with placeholders that point back to your data fields. This is what allows any system reading the file to understand both the content and how it should be displayed.
You don't need to edit the .amf file manually. But it's good to know it's there and what it contains, especially if you're handing the export off to a developer or uploading it to a platform that reads Amorfs data.
3. Understanding Your Output
When you download the package, you'll get a .zip file that looks something like this:
your-frame-name.zip
your-frame-name.amf
USER_GUIDELINE_EN.txt
assets/
(your images and icons)
The most important file in there is the .amf file. This is a plain text file that contains two things: your data and your template.
The data section holds all the structured information the plugin extracted from your design, things like field names and their values, organized in a clean, readable format.
The template section holds the visual layout of your design as HTML and CSS, with placeholders that point back to your data fields. This is what allows any system reading the file to understand both the content and how it should be displayed.
You don't need to edit the .amf file manually. But it's good to know it's there and what it contains, especially if you're handing the export off to a developer or uploading it to a platform that reads Amorfs data.
3. Understanding Your Output
When you download the package, you'll get a .zip file that looks something like this:
your-frame-name.zip
your-frame-name.amf
USER_GUIDELINE_EN.txt
assets/
(your images and icons)
The most important file in there is the .amf file. This is a plain text file that contains two things: your data and your template.
The data section holds all the structured information the plugin extracted from your design, things like field names and their values, organized in a clean, readable format.
The template section holds the visual layout of your design as HTML and CSS, with placeholders that point back to your data fields. This is what allows any system reading the file to understand both the content and how it should be displayed.
You don't need to edit the .amf file manually. But it's good to know it's there and what it contains, especially if you're handing the export off to a developer or uploading it to a platform that reads Amorfs data.
4. Good to Know
These are things the plugin handles automatically in the background. You don't need to do anything, but understanding them helps you get cleaner results and avoid surprises.
Hidden and locked layers are skipped: If a layer is hidden or locked in Figma, the plugin won't include it in the analysis.
Layer names become field names: The plugin converts your layer names into data field names automatically, cleaning them up into a standard lowercase format. A layer named "Full Name" becomes "full_name," for example. Vague names like "Frame 1" or "Rectangle 3" will trigger a warning because they don't make for useful field names.
If two layers end up with the same name after clean-up, the plugin adds a number to tell them apart automatically, like "name," "name_2," "name_3," and so on.Label and value pairs: If you have two text layers stacked where the first one ends with a colon, for example "Name: John Smith" the plugin reads them as a label and value pair.
Large files get flagged: Any single exported asset over approximately 500 KB will show a warning. The file still exports, it's just flagged so you can decide whether to compress it before using it downstream.
Icons follow naming conventions: The plugin identifies icons based on their layer names. If a vector or instance layer name starts with "icon," "ico," or "ic," or ends with "icon," it gets treated as an exportable icon. Vectors that don't follow this pattern may be treated as decorative elements instead.
4. Good to Know
These are things the plugin handles automatically in the background. You don't need to do anything, but understanding them helps you get cleaner results and avoid surprises.
Hidden and locked layers are skipped: If a layer is hidden or locked in Figma, the plugin won't include it in the analysis.
Layer names become field names: The plugin converts your layer names into data field names automatically, cleaning them up into a standard lowercase format. A layer named "Full Name" becomes "full_name," for example. Vague names like "Frame 1" or "Rectangle 3" will trigger a warning because they don't make for useful field names.
If two layers end up with the same name after clean-up, the plugin adds a number to tell them apart automatically, like "name," "name_2," "name_3," and so on.Label and value pairs: If you have two text layers stacked where the first one ends with a colon, for example "Name: John Smith" the plugin reads them as a label and value pair.
Large files get flagged: Any single exported asset over approximately 500 KB will show a warning. The file still exports, it's just flagged so you can decide whether to compress it before using it downstream.
Icons follow naming conventions: The plugin identifies icons based on their layer names. If a vector or instance layer name starts with "icon," "ico," or "ic," or ends with "icon," it gets treated as an exportable icon. Vectors that don't follow this pattern may be treated as decorative elements instead.
4. Good to Know
These are things the plugin handles automatically in the background. You don't need to do anything, but understanding them helps you get cleaner results and avoid surprises.
Hidden and locked layers are skipped: If a layer is hidden or locked in Figma, the plugin won't include it in the analysis.
Layer names become field names: The plugin converts your layer names into data field names automatically, cleaning them up into a standard lowercase format. A layer named "Full Name" becomes "full_name," for example. Vague names like "Frame 1" or "Rectangle 3" will trigger a warning because they don't make for useful field names.
If two layers end up with the same name after clean-up, the plugin adds a number to tell them apart automatically, like "name," "name_2," "name_3," and so on.Label and value pairs: If you have two text layers stacked where the first one ends with a colon, for example "Name: John Smith" the plugin reads them as a label and value pair.
Large files get flagged: Any single exported asset over approximately 500 KB will show a warning. The file still exports, it's just flagged so you can decide whether to compress it before using it downstream.
Icons follow naming conventions: The plugin identifies icons based on their layer names. If a vector or instance layer name starts with "icon," "ico," or "ic," or ends with "icon," it gets treated as an exportable icon. Vectors that don't follow this pattern may be treated as decorative elements instead.
5. Limitations
These are the situations where the plugin will slow down, warn you, or stop the export entirely. None of them are permanent blockers. In most cases, a small adjustment to your design is all it takes to get things moving again.
Limitation | Description |
|---|---|
Only one Frame at a time | The plugin only works with a single Frame selected. If you select multiple layers or an unsupported layer type, you'll get an invalid selection message. Just deselect everything and pick one frame to start fresh. |
Up to 12 image fills | If your design has more than 12 layers with image fills, the export will stop with an image limit error. Try splitting your design into smaller components or reducing the number of image-fill layers, then reselect the frame to try again. |
SVG and vector limits | The plugin can handle a reasonable number of vector elements, but if your frame contains too many SVG exports it will stop with an SVG limit error. Reduce the number of vector or icon layers and reselect to retry. Separately, if a single SVG is too complex to export as a vector, the plugin will flag it and suggest switching that specific element to a raster image (PNG or JPG) in Figma instead. |
Design size & complexity limits | To ensure smooth processing, the plugin will safely stop or block exports if your design exceeds approximately 20,000 layers or if the final output package exceeds 10 MB. This is typically caused by heavy embedded images, extremely complex vectors, or an unusually massive layer tree |
5. Limitations
These are the situations where the plugin will slow down, warn you, or stop the export entirely. None of them are permanent blockers. In most cases, a small adjustment to your design is all it takes to get things moving again.
Limitation | Description |
|---|---|
Only one Frame at a time | The plugin only works with a single Frame selected. If you select multiple layers or an unsupported layer type, you'll get an invalid selection message. Just deselect everything and pick one frame to start fresh. |
Up to 12 image fills | If your design has more than 12 layers with image fills, the export will stop with an image limit error. Try splitting your design into smaller components or reducing the number of image-fill layers, then reselect the frame to try again. |
SVG and vector limits | The plugin can handle a reasonable number of vector elements, but if your frame contains too many SVG exports it will stop with an SVG limit error. Reduce the number of vector or icon layers and reselect to retry. Separately, if a single SVG is too complex to export as a vector, the plugin will flag it and suggest switching that specific element to a raster image (PNG or JPG) in Figma instead. |
Design size & complexity limits | To ensure smooth processing, the plugin will safely stop or block exports if your design exceeds approximately 20,000 layers or if the final output package exceeds 10 MB. This is typically caused by heavy embedded images, extremely complex vectors, or an unusually massive layer tree |
5. Limitations
These are the situations where the plugin will slow down, warn you, or stop the export entirely. None of them are permanent blockers. In most cases, a small adjustment to your design is all it takes to get things moving again.
Limitation | Description |
|---|---|
Only one Frame at a time | The plugin only works with a single Frame selected. If you select multiple layers or an unsupported layer type, you'll get an invalid selection message. Just deselect everything and pick one frame to start fresh. |
Up to 12 image fills | If your design has more than 12 layers with image fills, the export will stop with an image limit error. Try splitting your design into smaller components or reducing the number of image-fill layers, then reselect the frame to try again. |
SVG and vector limits | The plugin can handle a reasonable number of vector elements, but if your frame contains too many SVG exports it will stop with an SVG limit error. Reduce the number of vector or icon layers and reselect to retry. Separately, if a single SVG is too complex to export as a vector, the plugin will flag it and suggest switching that specific element to a raster image (PNG or JPG) in Figma instead. |
Design size & complexity limits | To ensure smooth processing, the plugin will safely stop or block exports if your design exceeds approximately 20,000 layers or if the final output package exceeds 10 MB. This is typically caused by heavy embedded images, extremely complex vectors, or an unusually massive layer tree |
6. Troubleshooting
If something isn't working, here's a quick reference to get you back on track.
What you see | What to do |
|---|---|
Plugin stays idle, no analysis | Select exactly one Frame and try again |
Invalid selection message | Deselect everything, pick one Frame only |
Image limit error | Reduce image-fill layers to 12 or fewer, then reselect |
SVG limit error | Reduce the number of vector or icon exports, then reselect |
Complex SVG error | Simplify the vector in Figma or switch it to a PNG, then reselect |
Export blocked (too large) | Compress images, simplify vectors, reduce layer count |
Validation warning | Fix layer names, reduce duplicates, then reselect to re-analyze |
Plugin not responding | Close and reopen the plugin, then reselect your frame |
6. Troubleshooting
If something isn't working, here's a quick reference to get you back on track.
What you see | What to do |
|---|---|
Plugin stays idle, no analysis | Select exactly one Frame and try again |
Invalid selection message | Deselect everything, pick one Frame only |
Image limit error | Reduce image-fill layers to 12 or fewer, then reselect |
SVG limit error | Reduce the number of vector or icon exports, then reselect |
Complex SVG error | Simplify the vector in Figma or switch it to a PNG, then reselect |
Export blocked (too large) | Compress images, simplify vectors, reduce layer count |
Validation warning | Fix layer names, reduce duplicates, then reselect to re-analyze |
Plugin not responding | Close and reopen the plugin, then reselect your frame |
6. Troubleshooting
If something isn't working, here's a quick reference to get you back on track.
What you see | What to do |
|---|---|
Plugin stays idle, no analysis | Select exactly one Frame and try again |
Invalid selection message | Deselect everything, pick one Frame only |
Image limit error | Reduce image-fill layers to 12 or fewer, then reselect |
SVG limit error | Reduce the number of vector or icon exports, then reselect |
Complex SVG error | Simplify the vector in Figma or switch it to a PNG, then reselect |
Export blocked (too large) | Compress images, simplify vectors, reduce layer count |
Validation warning | Fix layer names, reduce duplicates, then reselect to re-analyze |
Plugin not responding | Close and reopen the plugin, then reselect your frame |
7. Wrapping Up
That's everything you need to work confidently with the Amorfs Data for Figma plugin. Most of the limitations you'll encounter have a simple fix, and once you get a feel for how the plugin reads your layers, you'll find it becomes a natural part of your export workflow.
If something isn't covered here or you run into something unexpected, reach out to us anytime at support@amorfs.com, or connect with us through our social channels in the footer.
7. Wrapping Up
That's everything you need to work confidently with the Amorfs Data for Figma plugin. Most of the limitations you'll encounter have a simple fix, and once you get a feel for how the plugin reads your layers, you'll find it becomes a natural part of your export workflow.
If something isn't covered here or you run into something unexpected, reach out to us anytime at support@amorfs.com, or connect with us through our social channels in the footer.
7. Wrapping Up
That's everything you need to work confidently with the Amorfs Data for Figma plugin. Most of the limitations you'll encounter have a simple fix, and once you get a feel for how the plugin reads your layers, you'll find it becomes a natural part of your export workflow.
If something isn't covered here or you run into something unexpected, reach out to us anytime at support@amorfs.com, or connect with us through our social channels in the footer.




" height="47.8243px" id="Fi98aqQOS" width="48.001px"/><path d="M 20.148 22.45 L 21.494 15.115 L 13.655 15.115 L 13.655 12.521 C 13.655 8.646 15.176 7.155 19.111 7.155 C 20.333 7.155 21.317 7.185 21.883 7.244 L 21.883 0.596 C 20.81 0.298 18.186 0 16.666 0 C 8.646 0 4.949 3.786 4.949 11.955 L 4.949 15.115 L 0 15.115 L 0 22.45 L 4.949 22.45 L 4.949 38.409 C 6.805 38.869 8.747 39.115 10.746 39.115 C 11.73 39.115 12.701 39.055 13.654 38.94 L 13.654 22.45 L 20.147 22.45 Z" fill="rgb(255, 255, 255)" height="39.11523px" id="o10gvlFLv" transform="translate(13.253 8.885)" width="21.883200000000002px"/></g></svg>)